Managing FogLAMPs
The FogLAMPs page serves as a centralized location for adding and managing FogLAMPs.
Adding a FogLAMP
To add a FogLAMP, first ensure that you are operating within an unlocked FogLAMP Manage version. Navigate to the FogLAMPs page and click Add FogLAMP.

Note: You can also click the dropdown menu next to the Add FogLAMP button and select discover. The discover FogLAMP feature will attempt to find all FogLAMPs in your network. The steps below assume that you are adding the FogLAMP via the Add FogLAMP button.

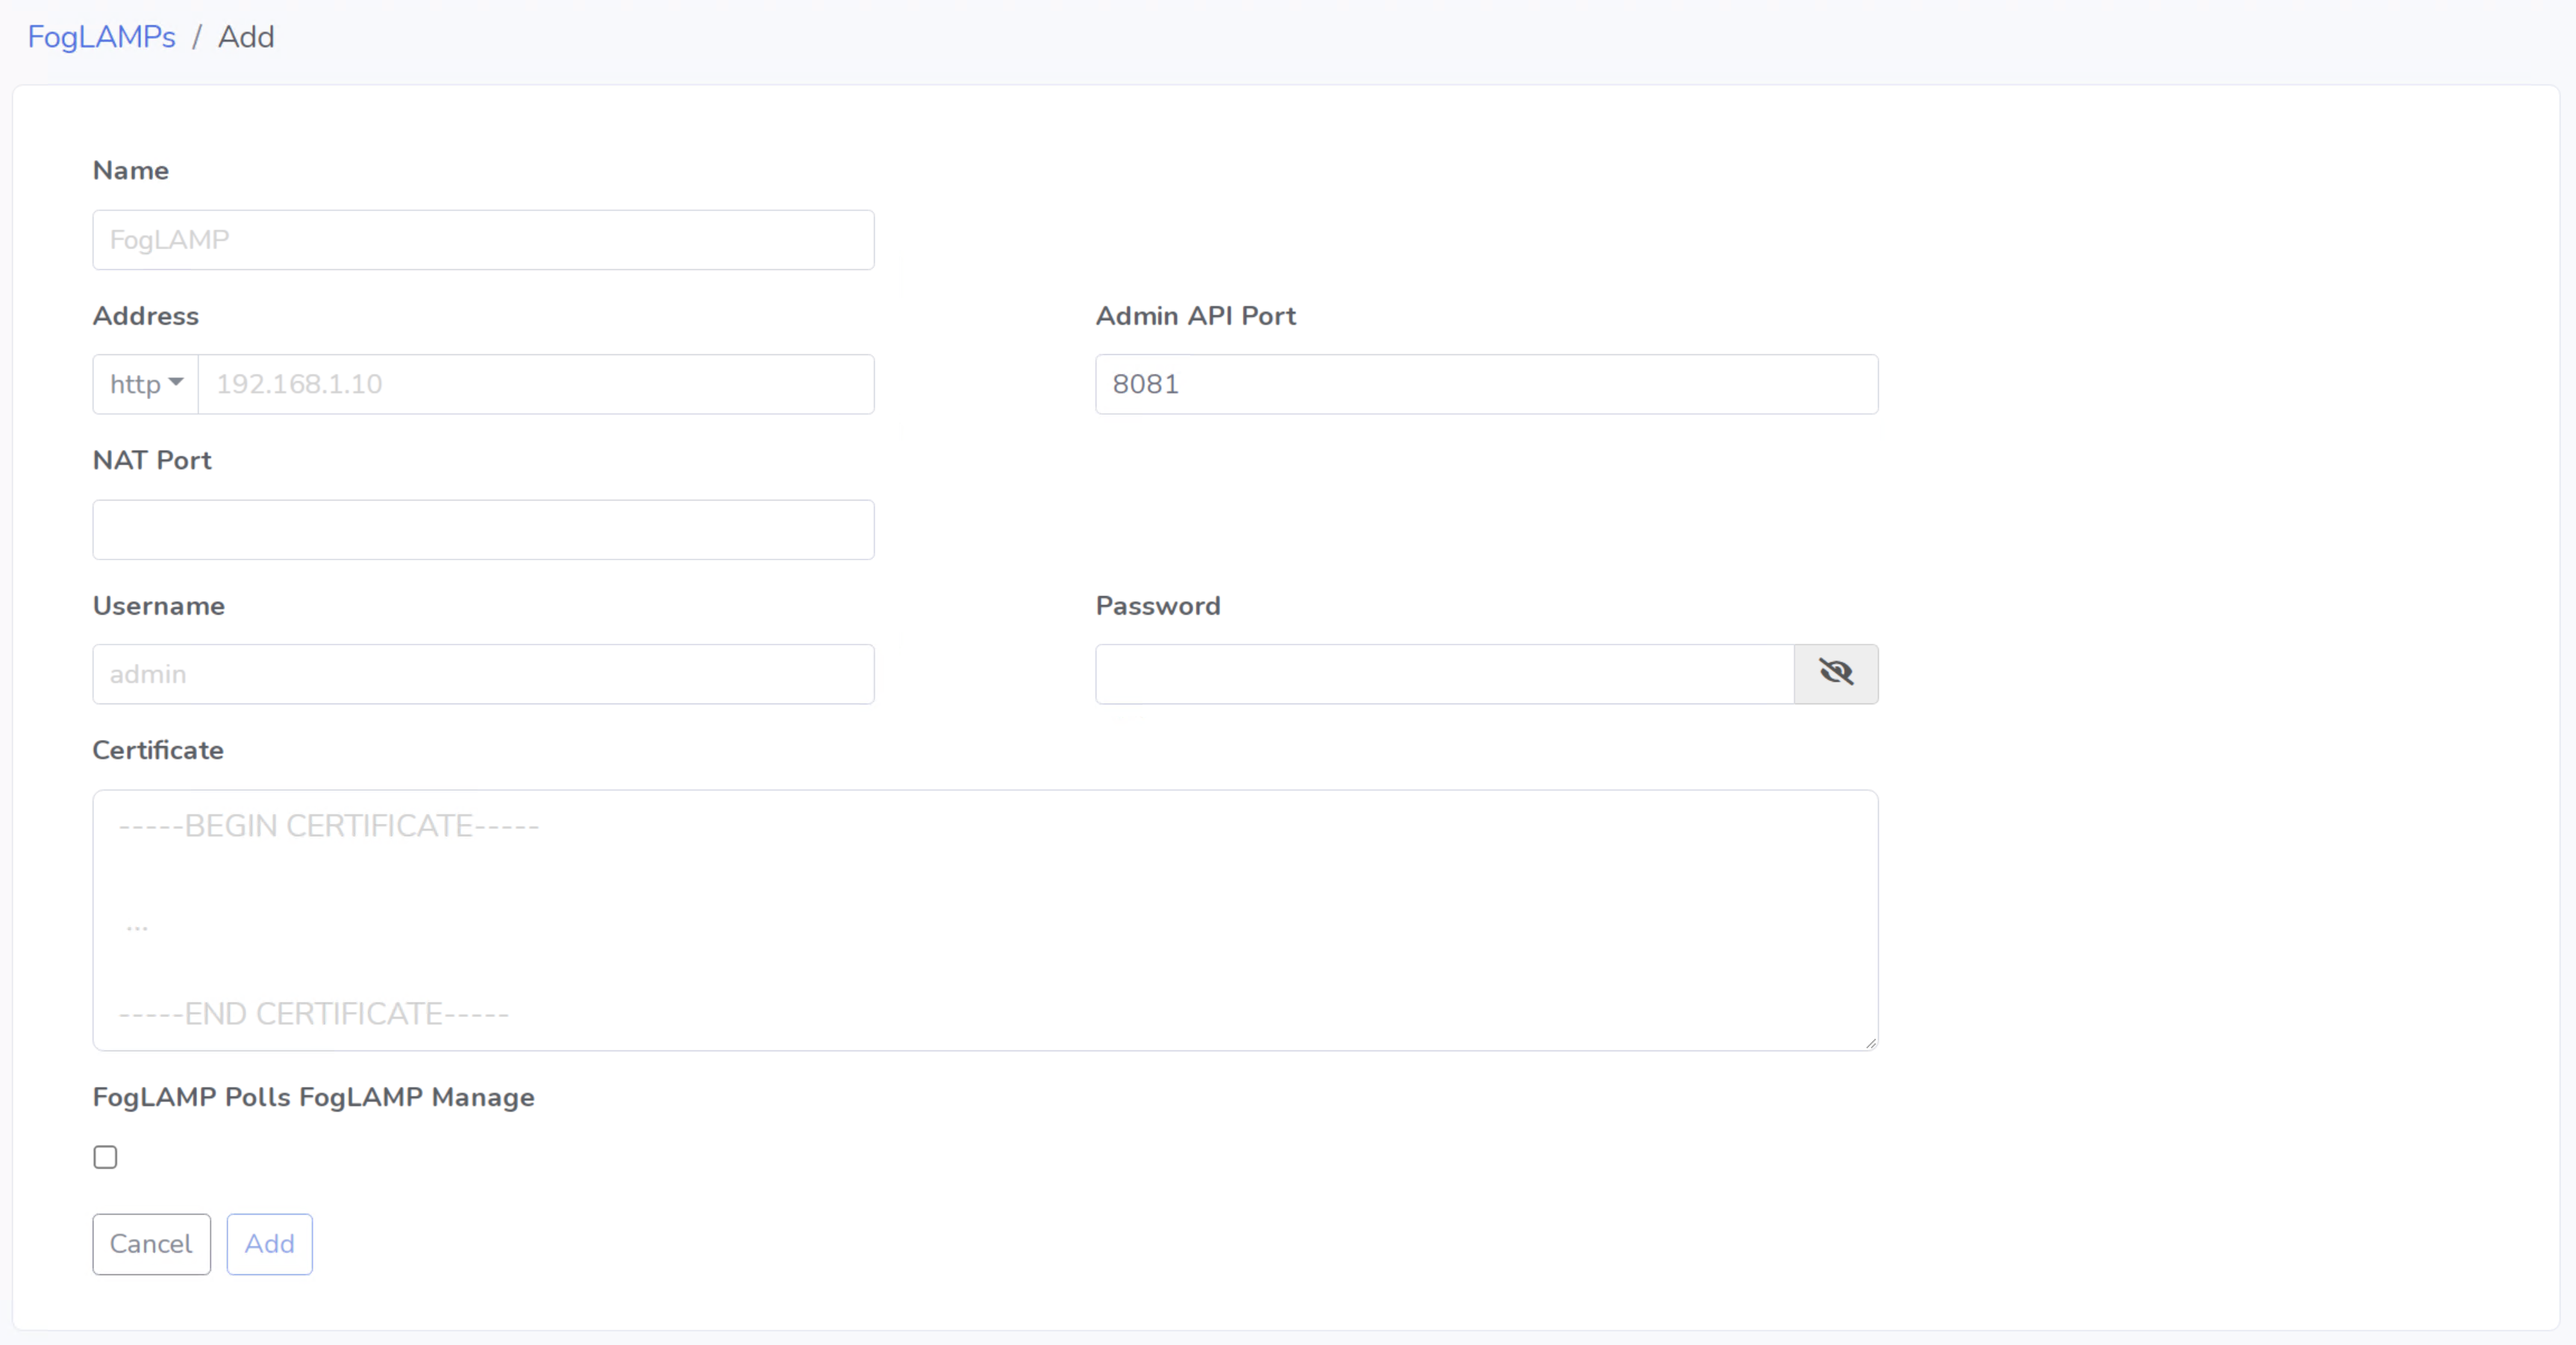
There are two required fields when adding a FogLAMP: Name and Address. The remaining fields are typically used when adding FogLAMPs that have pre-existing configurations or that require advanced networking configurations.
Fill in the required fields as described below:
Name: The name that the FogLAMP will be referred to within FogLAMP Manage.
Address: IP address of the FogLAMP to be added.
Add the private IP if FogLAMP is in the same network as FogLAMP Manage.
Add the public IP if FogLAMP is in a different network than FogLAMP Manage.
Next, if you are adding a FogLAMP with any pre-existing configurations or advanced networking configurations, fill out the appropriate additional fields as described below:
Protocol: This is the network protocol that the FogLAMP is currently configured to use at the time of adding the FogLAMP.
Clicking the HTTP dropdown will reveal the options HTTP and HTTPS.
Leave as HTTP unless you have specifically configured the FogLAMP to use HTTPS through the FogLAMP GUI or FogLAMP REST API.
Note: FogLAMP Manage will automatically secure the FogLAMP and convert the protocol to HTTPS during the FogLAMPs first deployment.
Admin API Port: The port that FogLAMP REST API is configured to use.
Default port is 8081 when using HTTP.
Default port is 1995 when using HTTPS.
You can check the Admin API Port within the FogLAMP GUI in the path: Configuration -> General -> Admin API.
NAT Port: Used when multiple containerized FogLAMPs share the same host, and port-forwarding has been configured for the instance.
Username: The username used for FogLAMP authentication.
Only applicable if the FogLAMP has been configured to use username and password based authentication via the FogLAMP GUI or FogLAMP REST API.
Password: The Password used for FogLAMP authentication.
Only applicable if the FogLAMP has been configured to use username and password based authentication via the FogLAMP GUI or FogLAMP REST API.
Certificate: The certificate used for FogLAMP authentication.
Only applicable if the FogLAMP has been configured to use certificate based authentication via the FogLAMP GUI or FogLAMP REST API.
Poll Mode: Enabling Poll Mode indicates to FogLAMP Manage that rather than pushing configurations out to the FogLAMP, the FogLAMP will pull the configuration from FogLAMP Manage.
This will remain unchecked in most use cases.
See Poll Mode section for more information.
Clicking Add will complete the process. Once a FogLAMP is added it is highly recommended to deploy before making any further configuration changes within FogLAMP Manage. During a FogLAMPs first deployment, FogLAMP Manage will secure the FogLAMP. During this process, the FogLAMP will switch to use HTTPS communication and certificate based authentication.
Note: Once a FogLAMP has been added into FogLAMP Manage, you should NEVER run the reset command on the FogLAMP. This action is not supported and will lead to issues with managing the FogLAMP.
Push Mode vs Poll Mode
Push mode is the default mode when adding a FogLAMP. With Push mode, FogLAMP Manage pushes the configurations out to the FogLAMP when a version gets deployed.
Poll mode on the other hand empowers FogLAMPs with the ability to initiate configuration updates rather than FogLAMP Manage. When a Poll mode FogLAMP performs the poll action, FogLAMP Manage will send the configuration of the FogLAMP as a response.
When Poll Mode should be used:
If a FogLAMP is located within a very secure firewall, the ports necessary for FogLAMP Manage to push a configuration to a FogLAMP might be closed. If the FogLAMP is configured to use Poll mode, the FogLAMP will reach out from within the firewall and poll the configuration from the FogLAMP Manage instance.
If a FogLAMP has intermittent power or connectivity, there is no guarantee that the FogLAMP would be up and running during the time of a Push deployment. If the FogLAMP is configured to use Poll mode, the FogLAMP can be scheduled to poll the configuration from FogLAMP Manage during its uptime.
How to Configure Poll Mode
Install foglamp-service-management
Via apt repository
sudo apt install -y foglamp-service-management
Via curl command
curl -sX POST http://localhost:8081/foglamp/service?action=install -d '{"format":"repository", "name": "foglamp-service-management"}'
Verify installation
Command:
curl -sX GET http://localhost:8081/foglamp/service/installed | jq
Response:
{
   "services": [
      "notification",
      "storage",
      "south",
      "management"
   ]
}
Add Management Service
Command:
curl -sX POST http://localhost:8081/foglamp/service -d '{"name": "FM Agent", "type": "management", "enabled": "true"}' | jq
Response:
{
   "id": "0e43def5-92f3-42de-b8cc-6f91f08c9cd7",
   "name": "FM Agent"
}
In FogLAMP GUI, Go to Configuration->FM Agent. Update config:
FogMan host - <FogMan IP Address>
Enable - True
(For Username/password, You may want to create poll role user in FogMan and use those credentials, instead of admin/fogman)
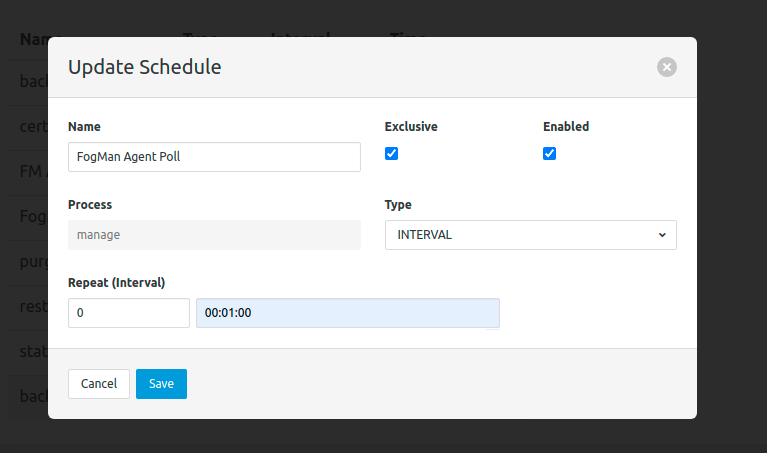
Go to Schedules and Verify there are two (2) schedules.
FM Agent - STARTUP (for Management service)
FogMan Agent Poll - The default TIMED schedule will execute once per day at a time between midnight and 3am local time, And for the manage task only (i.e POLL operation)
Command:
curl -sX GET http://localhost:8081/foglamp/schedule | jq
Response:
{
   "id": "ecc64ce3-6f3c-4cfb-b310-21113f04cb18",
   "name": "FM Agent",
   "processName": "management",
   "type": "STARTUP",
   "repeat": 0,
   "time": 0,
   "day": null,
   "exclusive": true,
   "enabled": true
},
{
   "id": "eb8372e8-a80b-4f3b-97ea-dca1ed19bc68",
   "name": "FogMan Agent Poll",
   "processName": "manage",
   "type": "TIMED",
   "repeat": 86400.0,
   "time": 60,
   "day": null,
   "exclusive": true,
   "enabled": true
}
Update FogMan Agent Poll schedule from Timed to Interval for test runs, say 15 mins
Go to FogMan, Wait for FogMan Agent Poll schedule run/ watch syslogs, click on refresh icon in FogLAMPs list;

Now you can make connections, add FogLAMP users for certificated based login etc. Deploy. Once set to a current version, management service/agent will sync itself per FogMan Agent Poll schedule.
Monitoring FogLAMP Health
When operating within the “live” version of FogLAMP Manage, the FogLAMPs page displays several useful metrics for monitoring the health of your FogLAMPs.
Overall data ingress and egress on a per FogLAMP basis to ensure that data is flowing in and out of your system consistently. Note that the actual data does not flow through FogLAMP Manage, this is purely relaying the number of readings that have passed in and out.
Hovering the green/yellow/red health indicator will reveal the current health for each microservice running on that FogLAMP.
Hovering the IP Address of a FogLAMP will reveal the software version the FogLAMP is currently running.
Connecting to a Managed FogLAMPs GUI
FogLAMP Manage allows you to securely connect to the GUI’s of each managed FogLAMP all from one centralized application. All FogLAMPs that have been brought under management are secured using HTTPs communications and certificate based authentication. FogLAMP Manage is able to use the IP and certificate of each FogLAMP to open a new tab and form a secure connection to each FogLAMPs GUI.
With this feature, there is no need to bookmark the GUI of each individual FogLAMP or organize all of the certificates required for a secure authentication.
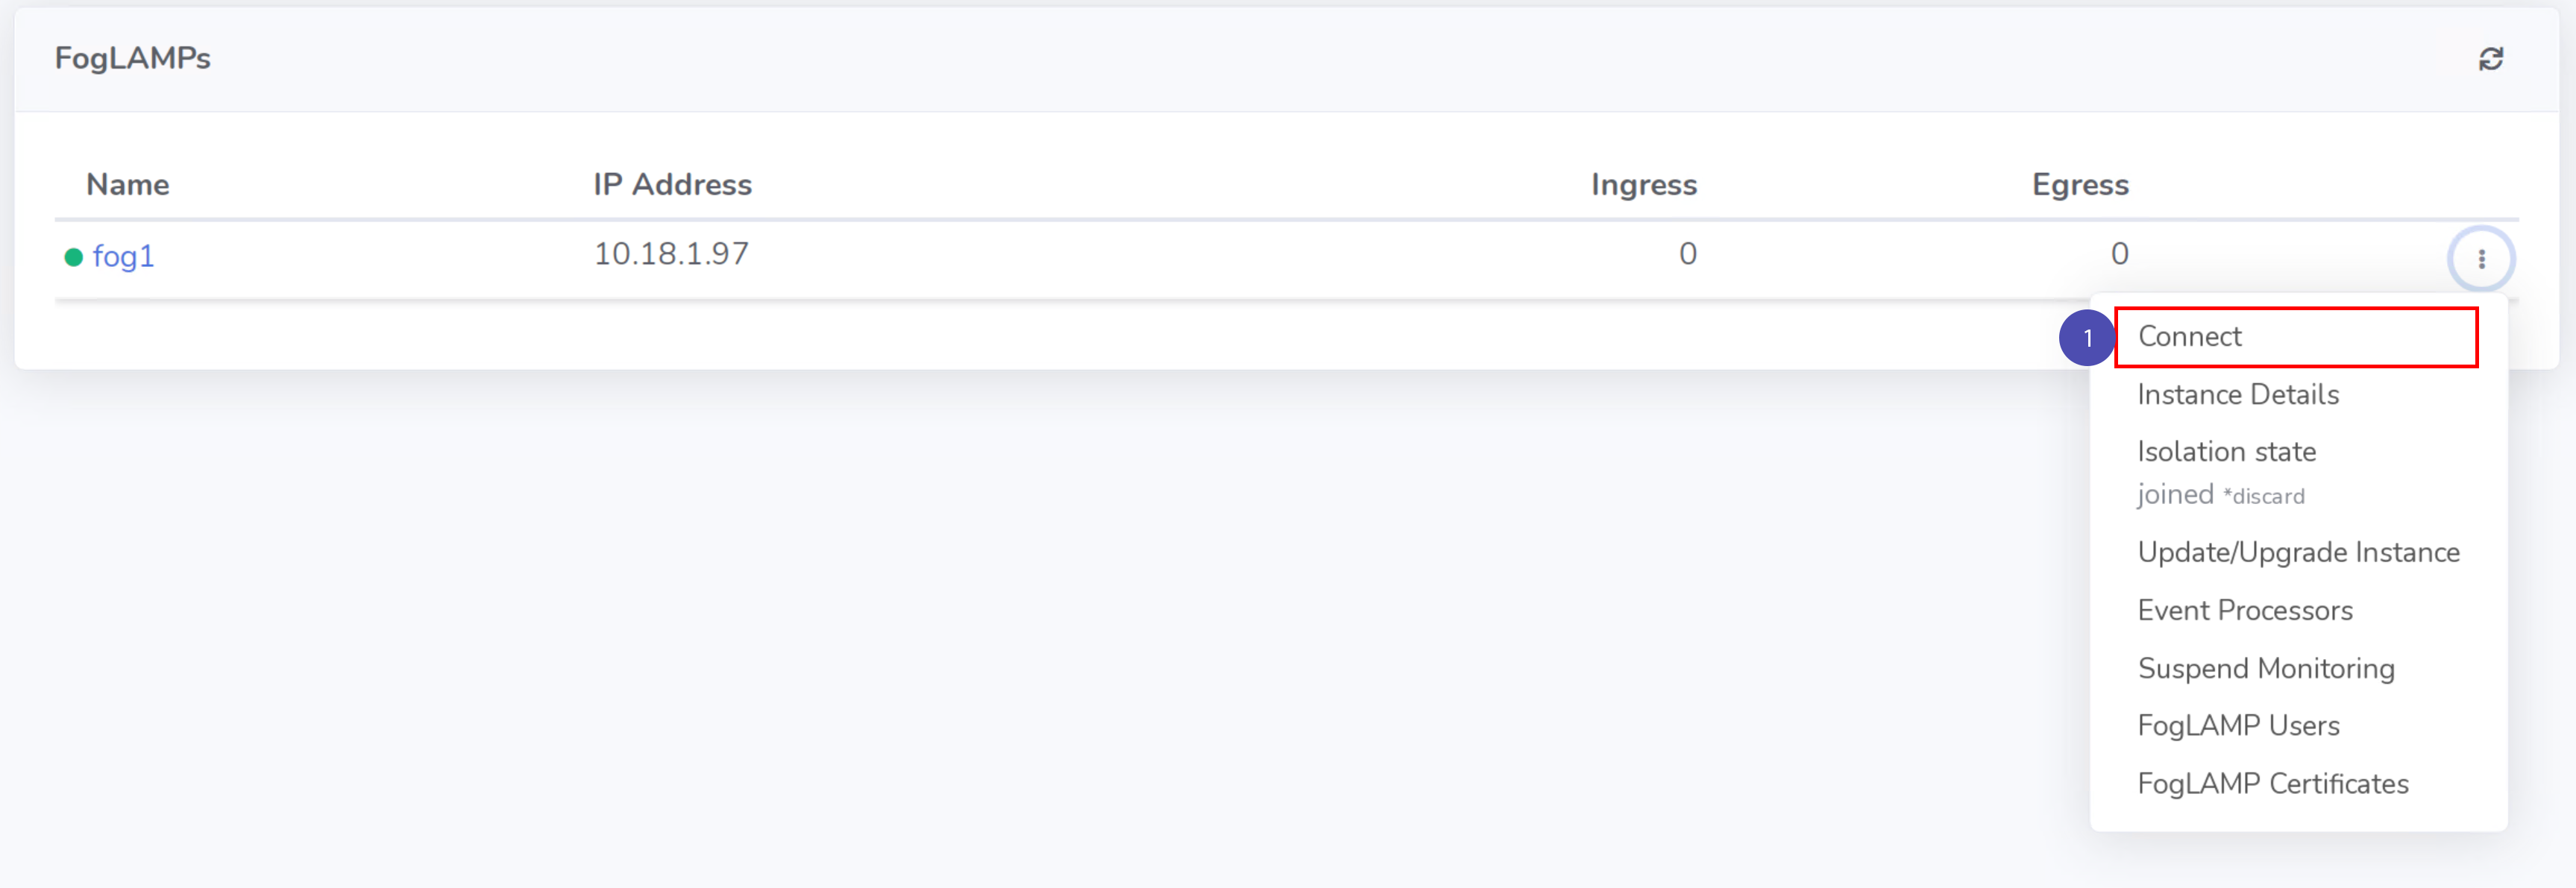
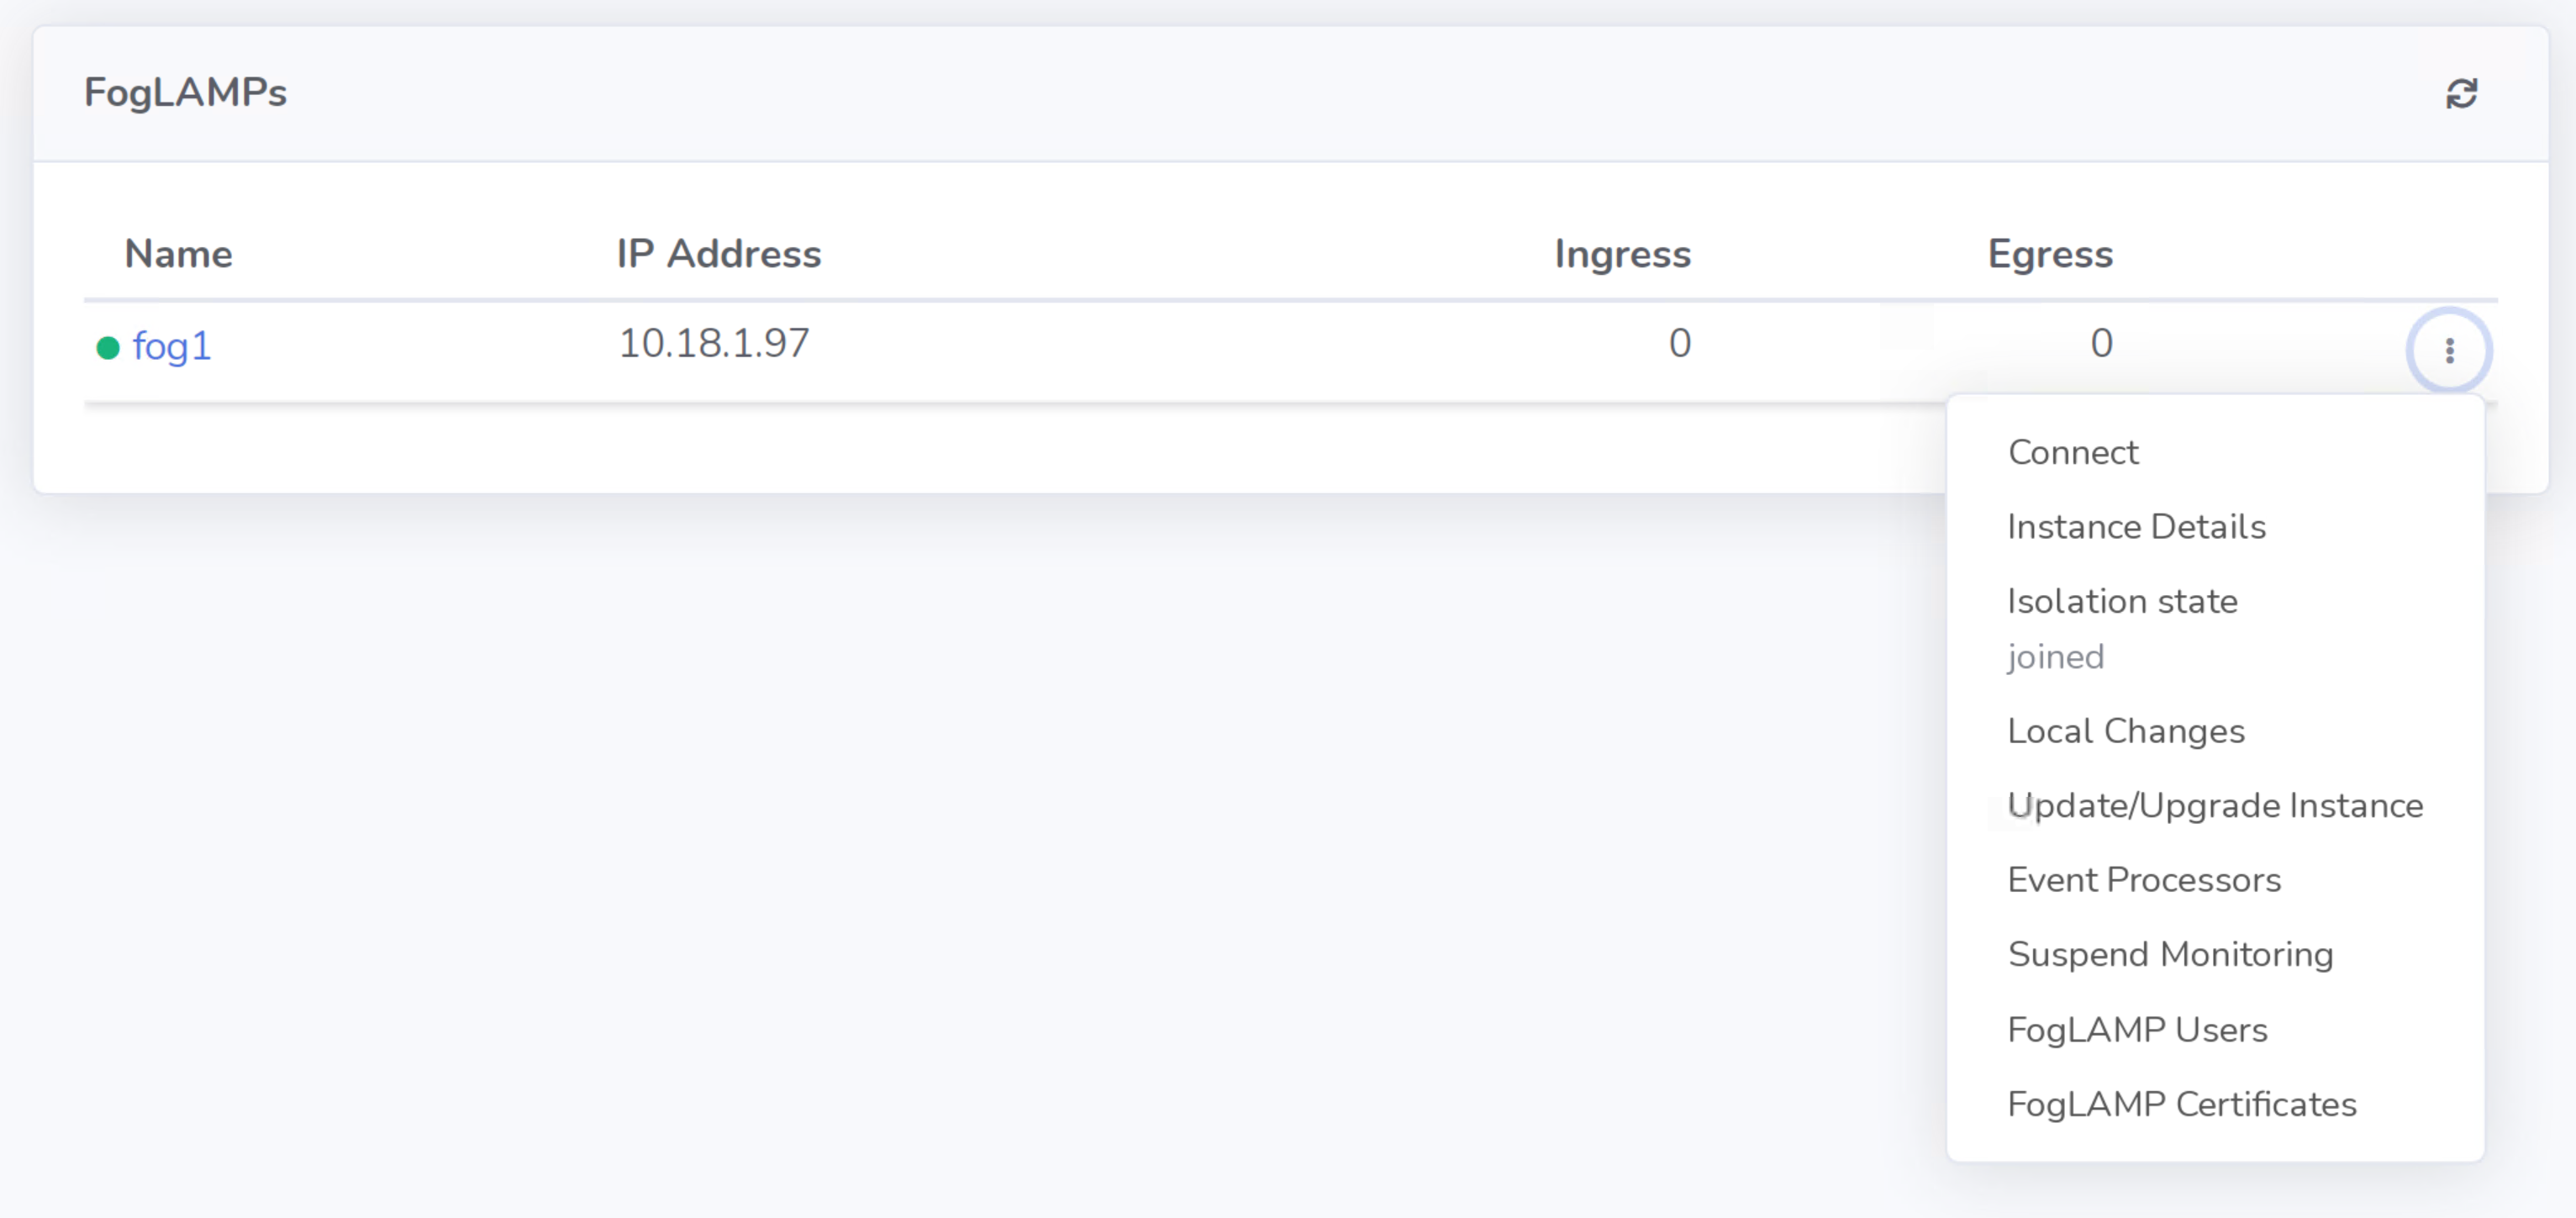
To connect to the GUI of a particular FogLAMP, first ensure that you are operating in a locked FogLAMP Manage version. Navigate to the FogLAMPs page, click the ⋮ button for the FogLAMP you wish to connect to, and select Connect from the dropdown menu. This action will open a new tab within your browser. FogLAMP Manage will utilize the certificate of the corresponding FogLAMP to complete the user authentication required to access the FogLAMPs GUI.
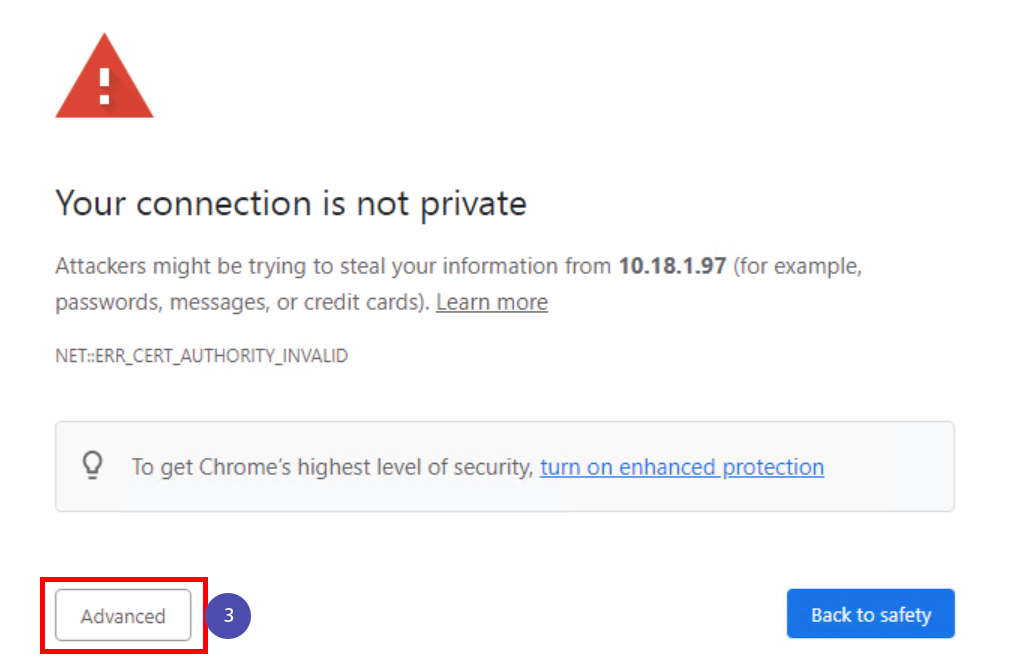
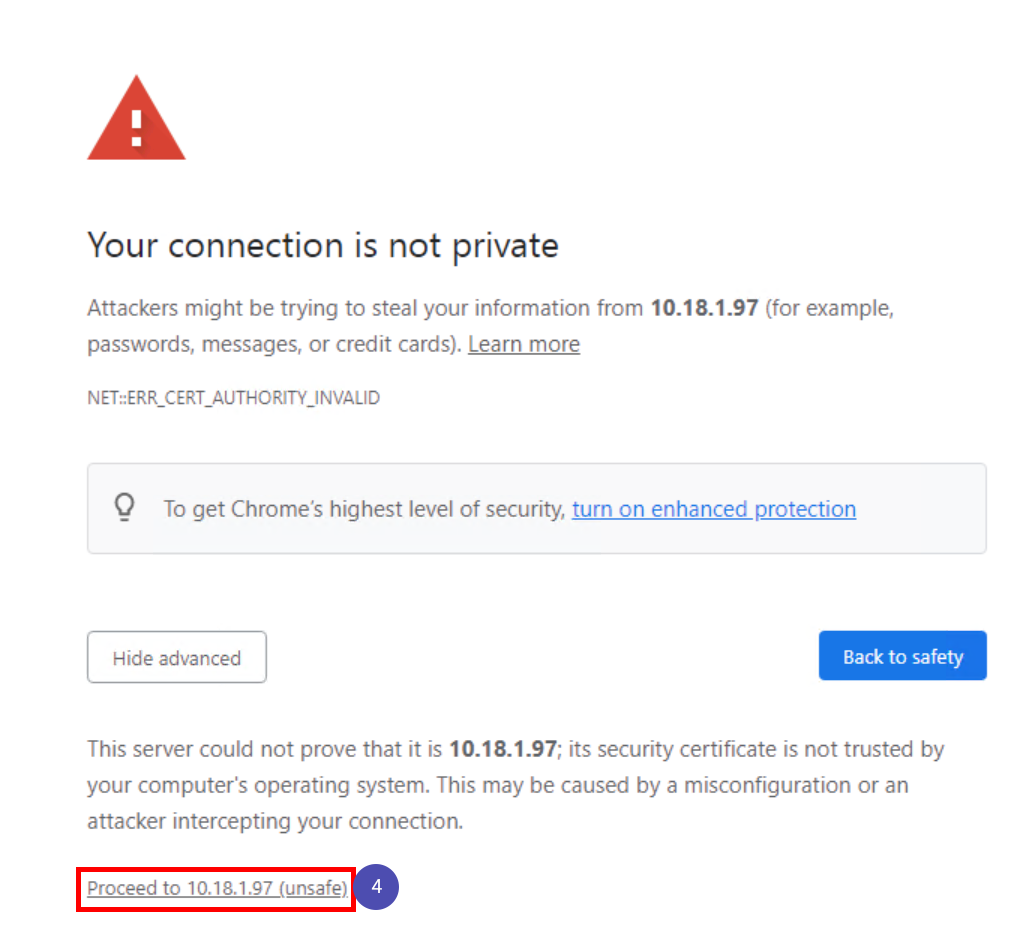
When you click Connect, you may be met with the following message:
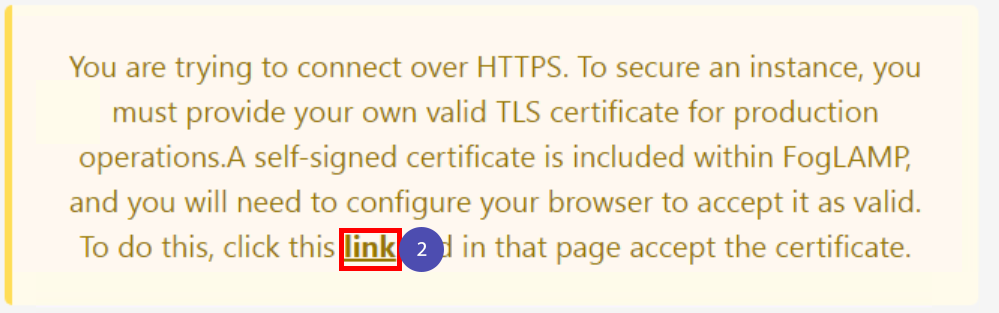
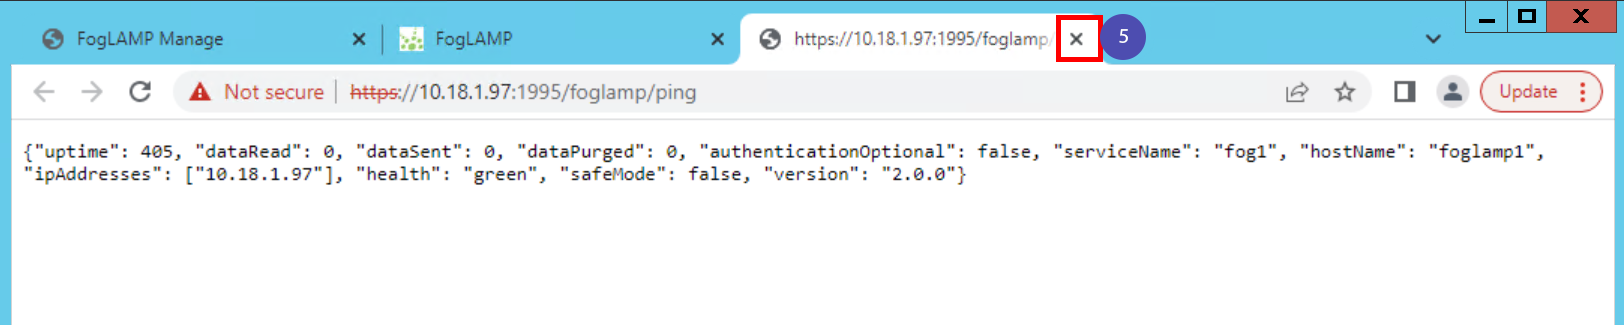
You must tell our browser that the FogLAMPs self-signed certificate is acceptable. To do this, simply click the word link underlined in bold. This will open the browser warning with a message along the lines of “Your connection is not private”. Click the Advanced button and then click proceed to allow the use of the self-signed certificate. Any tabs that were created as a result of this security warning can now be closed.
Upgrading a FogLAMPs Software
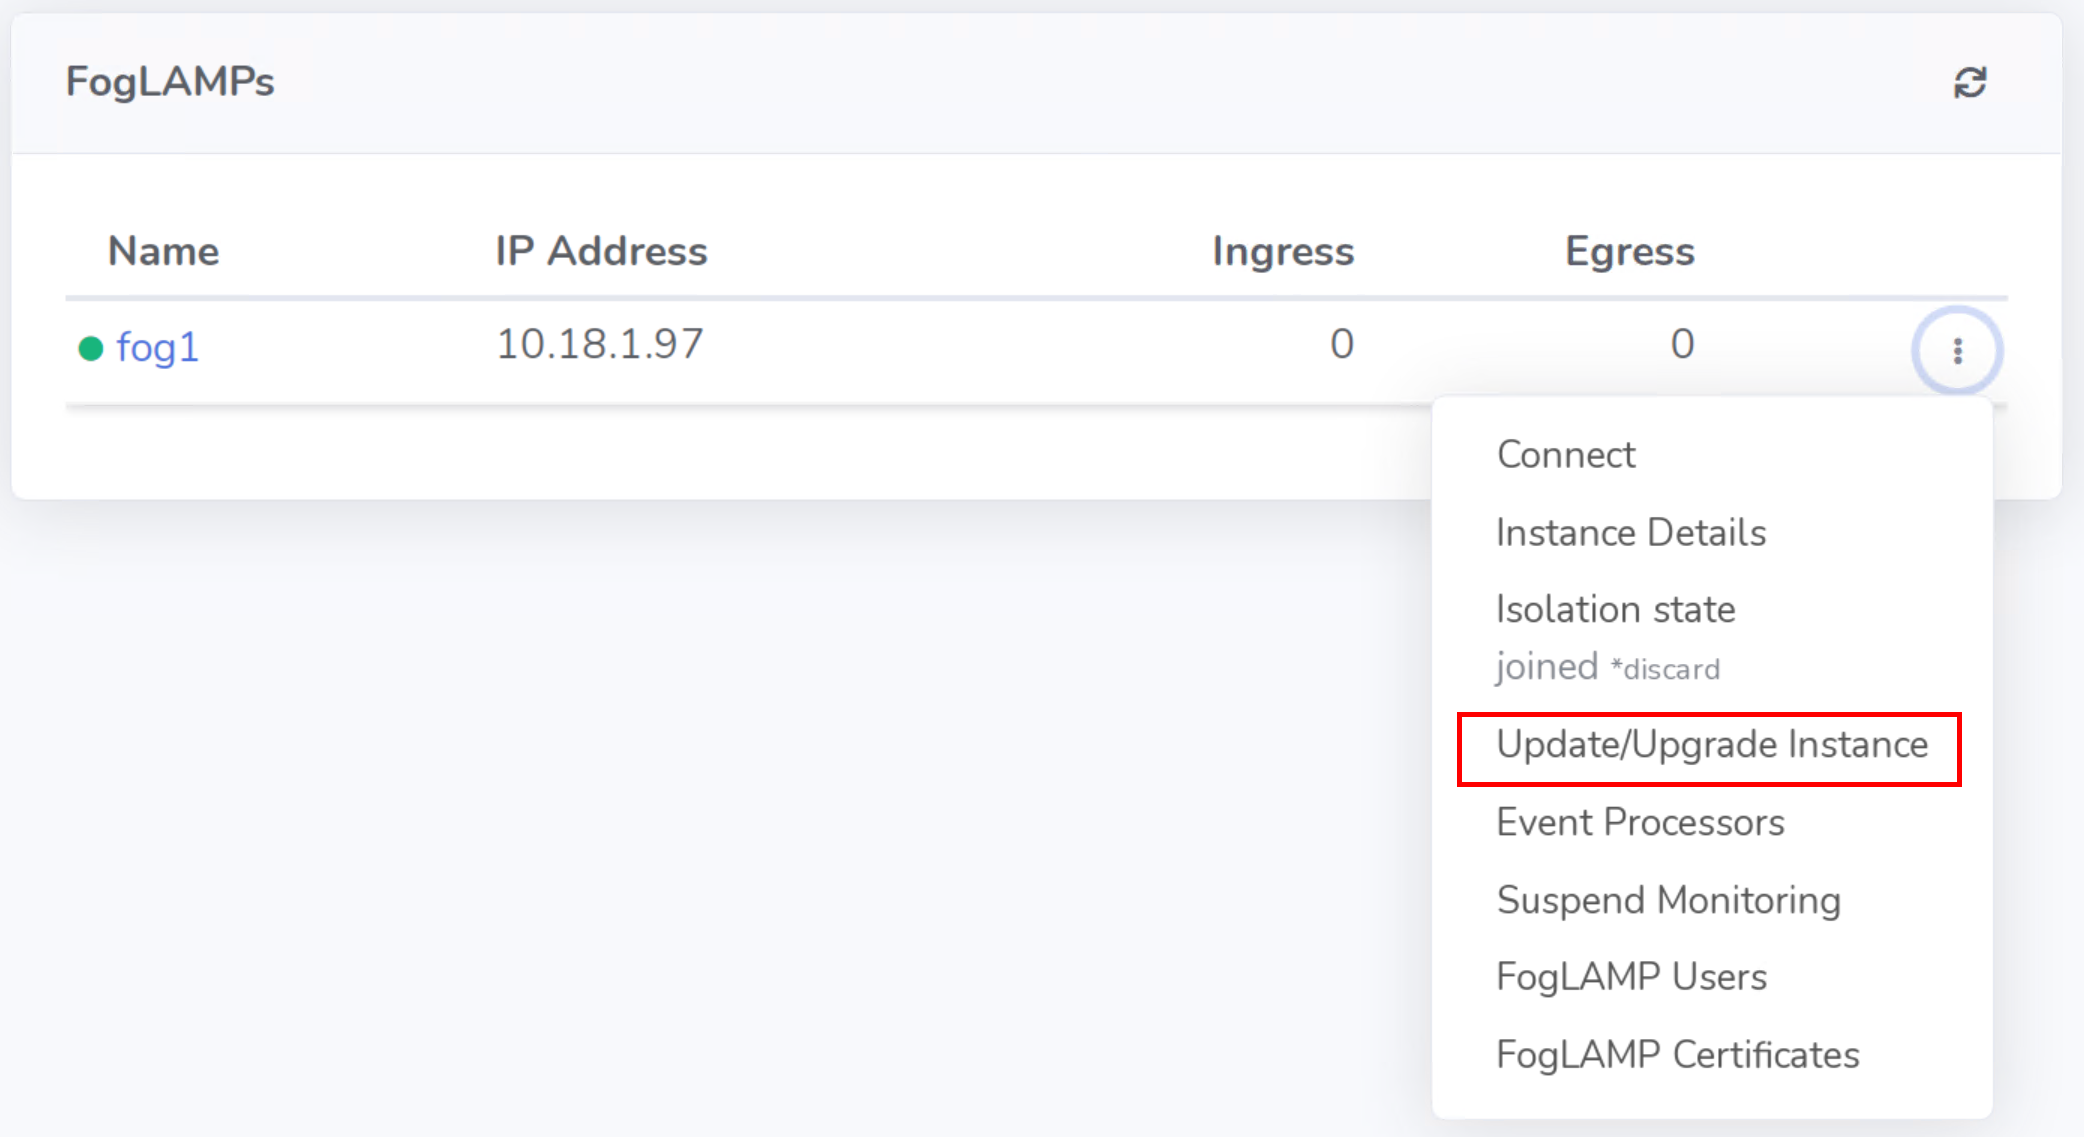
To upgrade a FogLAMP’s software version from the FogLAMP Manage GUI, first ensure that you are operating within the live FogLAMP Manage version. Navigate to the FogLAMPs page, click the ⋮ button for the FogLAMP that you would like to update, and then click Update/Upgrade Instance. A popup will appear confirming that you wish to update the FogLAMP’s software, click Update. A message will appear confirming that the FogLAMPs update has been queued.
Note: Only FogLAMPs with a version of 2.0.1 can have their software updated via this method. If the FogLAMP is running an earlier version, the software must be updated manually via the instances command line.
Developmental FogLAMP Instances
When a FogLAMP is undergoing local development, you may indicate to FogLAMP Manage that no configuration changes should be made when a FogLAMP Manage version gets deployed. This allows for the local configuration of FogLAMPs to be preserved regardless of how the FogLAMP is configured within FogLAMP Manage.
Every FogLAMP that is managed by FogLAMP Manage can be toggled between the Joined (default) state and the Isolated state. Joined FogLAMPs are “subscribed” to FogLAMP Manage’s global versioning system and receive configuration updates each time a version gets deployed. Isolated FogLAMPs on the other hand do not receive configuration updates when a version is deployed. The isolation of FogLAMPs allows for local FogLAMP development without the risk of FogLAMP Manage overwriting the local configurations.
Note: All local FogLAMP changes must be reconciled in FogLAMP Manage before toggling a FogLAMP from the Isolated state to the Joined state.
A FogLAMP that is isolated for development work will:
Not have any changes pushed to it by FogLAMP Manage.
Be marked with an isolated label within the FogLAMPs page.
Have the health of its services monitored by FogLAMP Manage.
Indicate if there are local changes on the FogLAMP instance and allow for those changes to be imported into FogLAMP Manage.
How to Toggle Between Joined and Isolated
To toggle a FogLAMP between Joined and Isolated, first ensure that you are operating within an unlocked FogLAMP Manage version. Navigate to the FogLAMPs page and click the ⋮ button corresponding to the FogLAMP you wish to toggle between Joined and Isolated. From the menu select Isolation State.
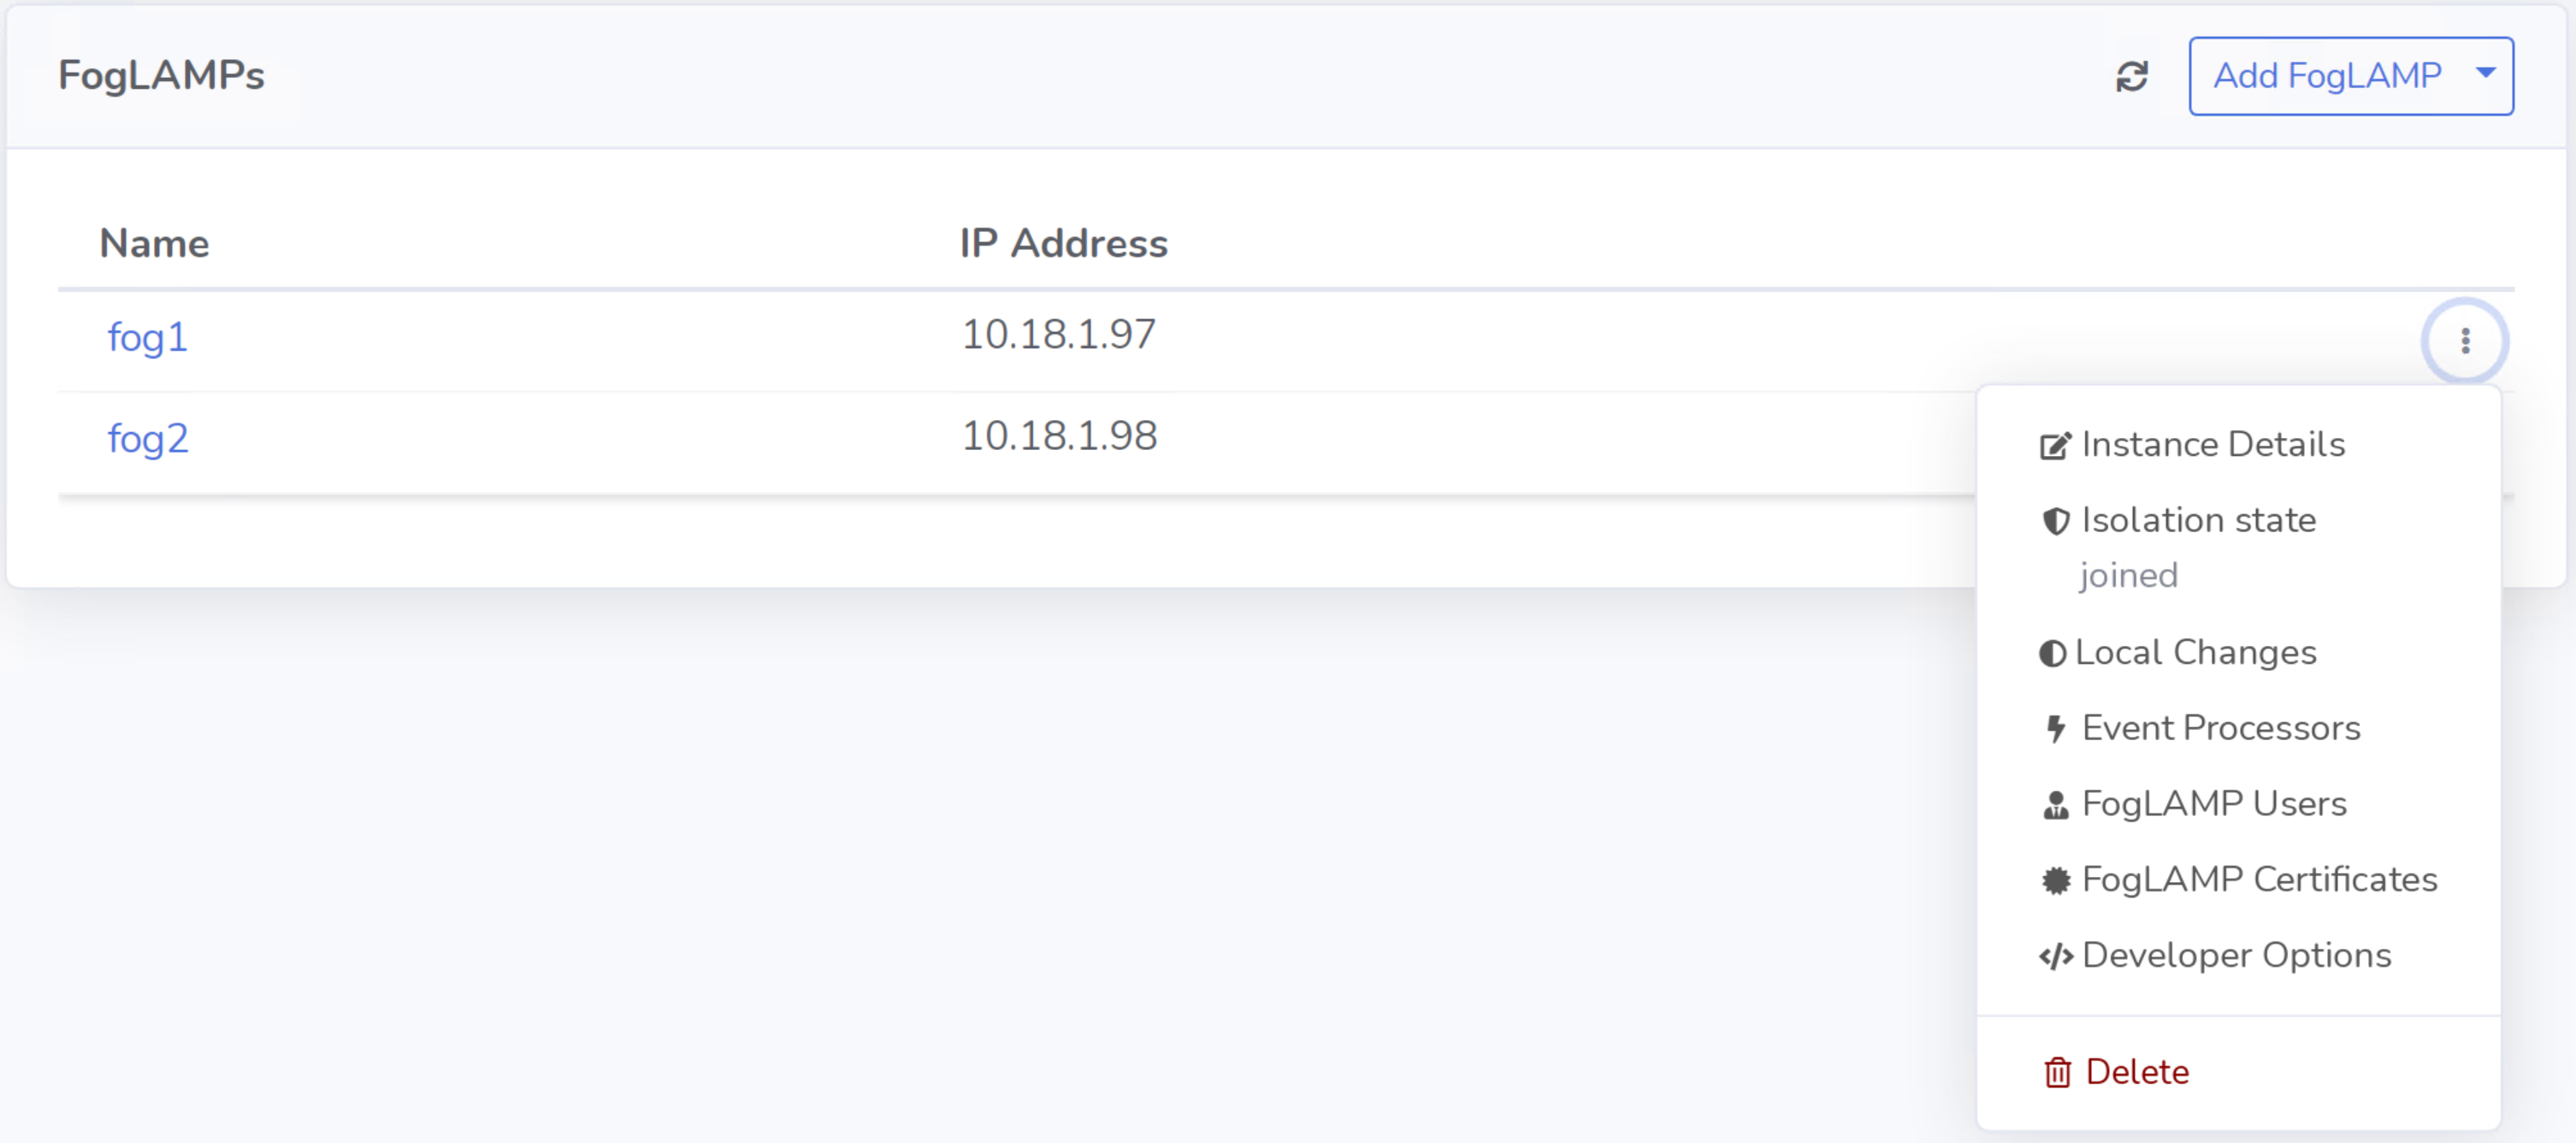
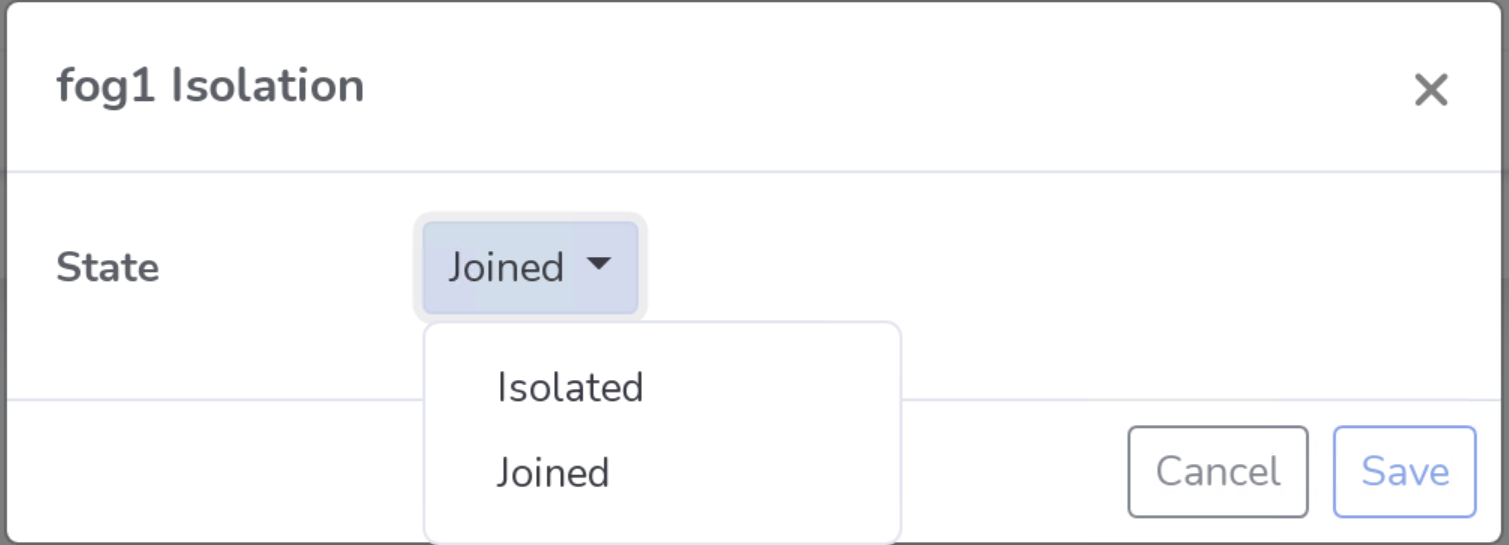
A popup window will appear with a dropdown menu containing the options Joined and Isolated. Select the desired state and click Save.
Note: If you are switching from Isolated to Joined, all local changes must be resolved.
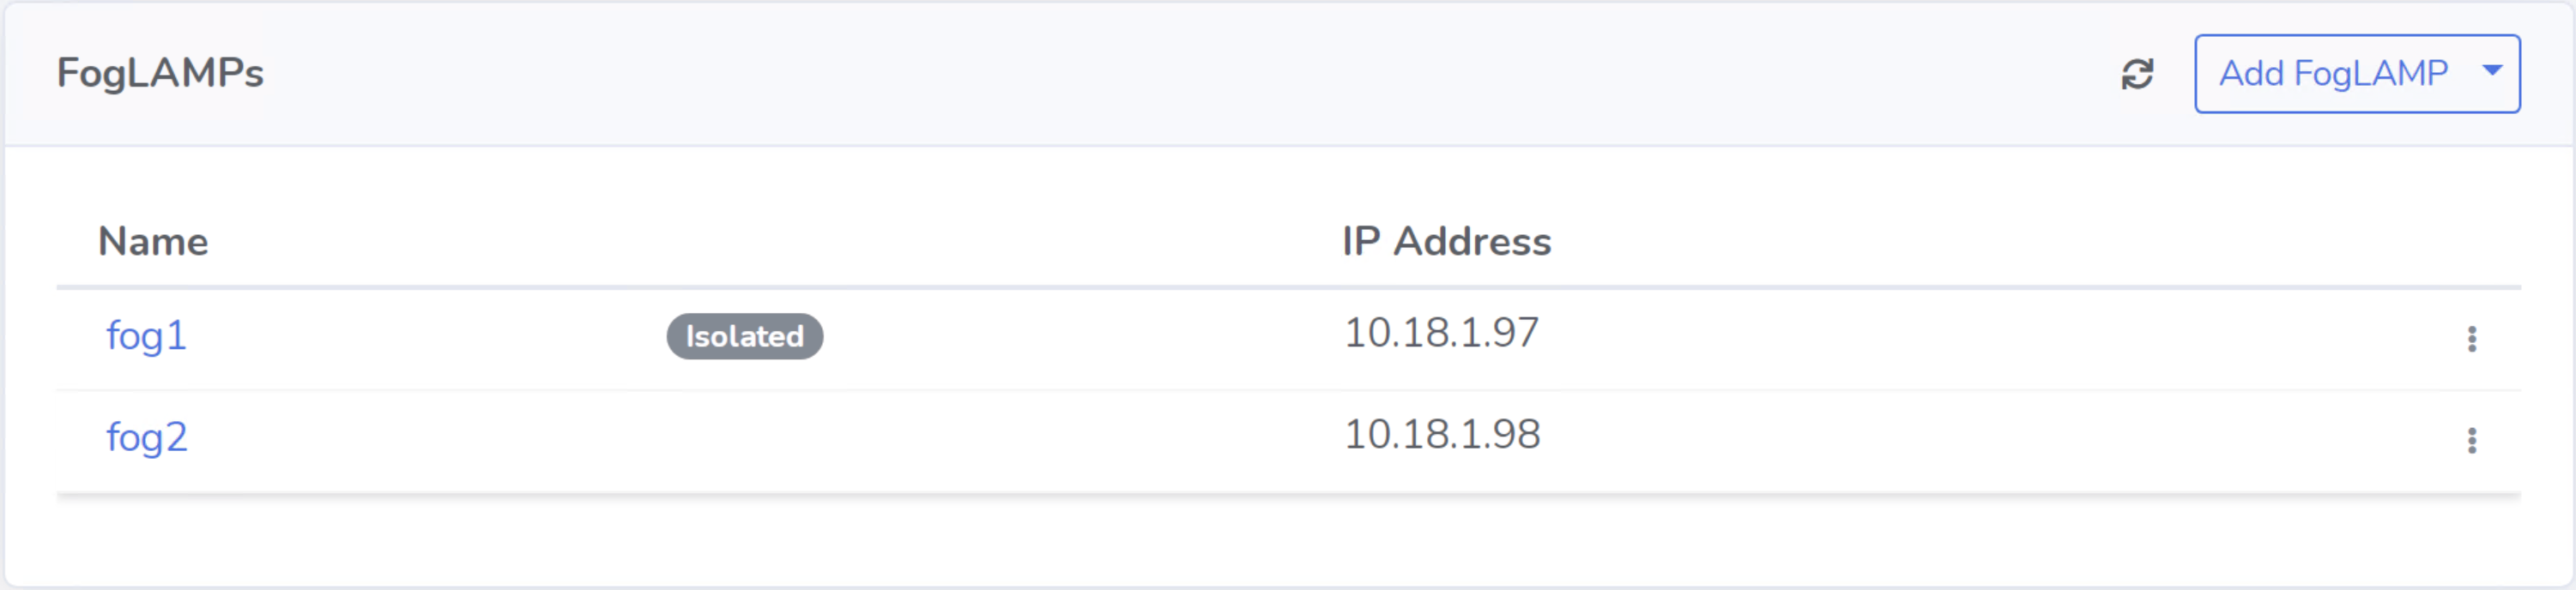
Each FogLAMP that is in an Isolated state is tagged with an Isolated indicator as shown below.
Importing Local Changes
Overview
In FogLAMP Manage terminology, a Local Change is a configuration change that was made to a single FogLAMP (either through the FogLAMP GUI or the FogLAMP REST API) rather than through FogLAMP Manage.
The Importing Local Changes feature grants users the flexibility to make local changes to managed FogLAMPs and import those changes into the central FogLAMP Manage system. When changes are imported, FogLAMP Manage resolves the differences in how FogLAMP and FogLAMP Manage represent their configurations. For example, all South Services imported from a FogLAMP are represented within FogLAMP Manage as Data Sources that get incorporated into the Flows Page.
The sections below outline the processes involved when importing local changes.
Discovery Process
The Local Changes feature works by first performing a discovery call on the FogLAMP. This discovery call determines which changes have been made locally on the FogLAMP and are eligible to be imported into FogLAMP Manage. The feature detects the addition and deletion of services as well as all schedule and configuration changes.
Note: The discovery call can only be made against FogLAMPs that are added in push mode. FogLAMPs added in poll mode are not yet supported; however, similar round trip mechanisms may be added for poll mode FogLAMP at a future date.
Resolving Local Changes
Each FogLAMP under management by FogLAMP Manage is either Joined with FogLAMP Manage, or Isolated from it. Those in a Joined state must have all Local Changes resolved before a new FogLAMP Manage version can be deployed. FogLAMPs that are in an Isolated state are exempt from this rule, as Isolated FogLAMPs do not receive configuration changes on deployments. So, if you are working on a new FogLAMP configuration at the FogLAMP, and intentionally don’t yet want it to be synced with FogLAMP Manage, you can set it to be Isolated.
Once the discovery process is complete, each Local Change on Joined FogLAMPs needs to be resolved by either accepting or discarding the change.
Choosing to Accept a change will cause the change to be imported into the unlocked FogLAMP Manage version. Imported South Services, North Services, and Filters can be observed in the Flows page of FogLAMP Manage.
Choosing to Discard a change will indicate to FogLAMP Manage that the local change should not get imported into FogLAMP Manage. This discarded change will remain locally on the FogLAMP. If FogLAMP Manage has the corresponding FogLAMP in the Joined state, the local change will be overwritten on the FogLAMP during the next deployment of a FogLAMP Manage version.
Note: The Discard action is not permanent, you may choose to Accept the change at a later time.
Local Changes Walkthrough
In order to accept or discard Local Changes, first ensure that you are operating within an unlocked FogLAMP Manage version. From the FogLAMPs page of FogLAMP Manage, click the ⋮ button corresponding to the FogLAMP with local changes to resolve. Select Local Changes from the menu.
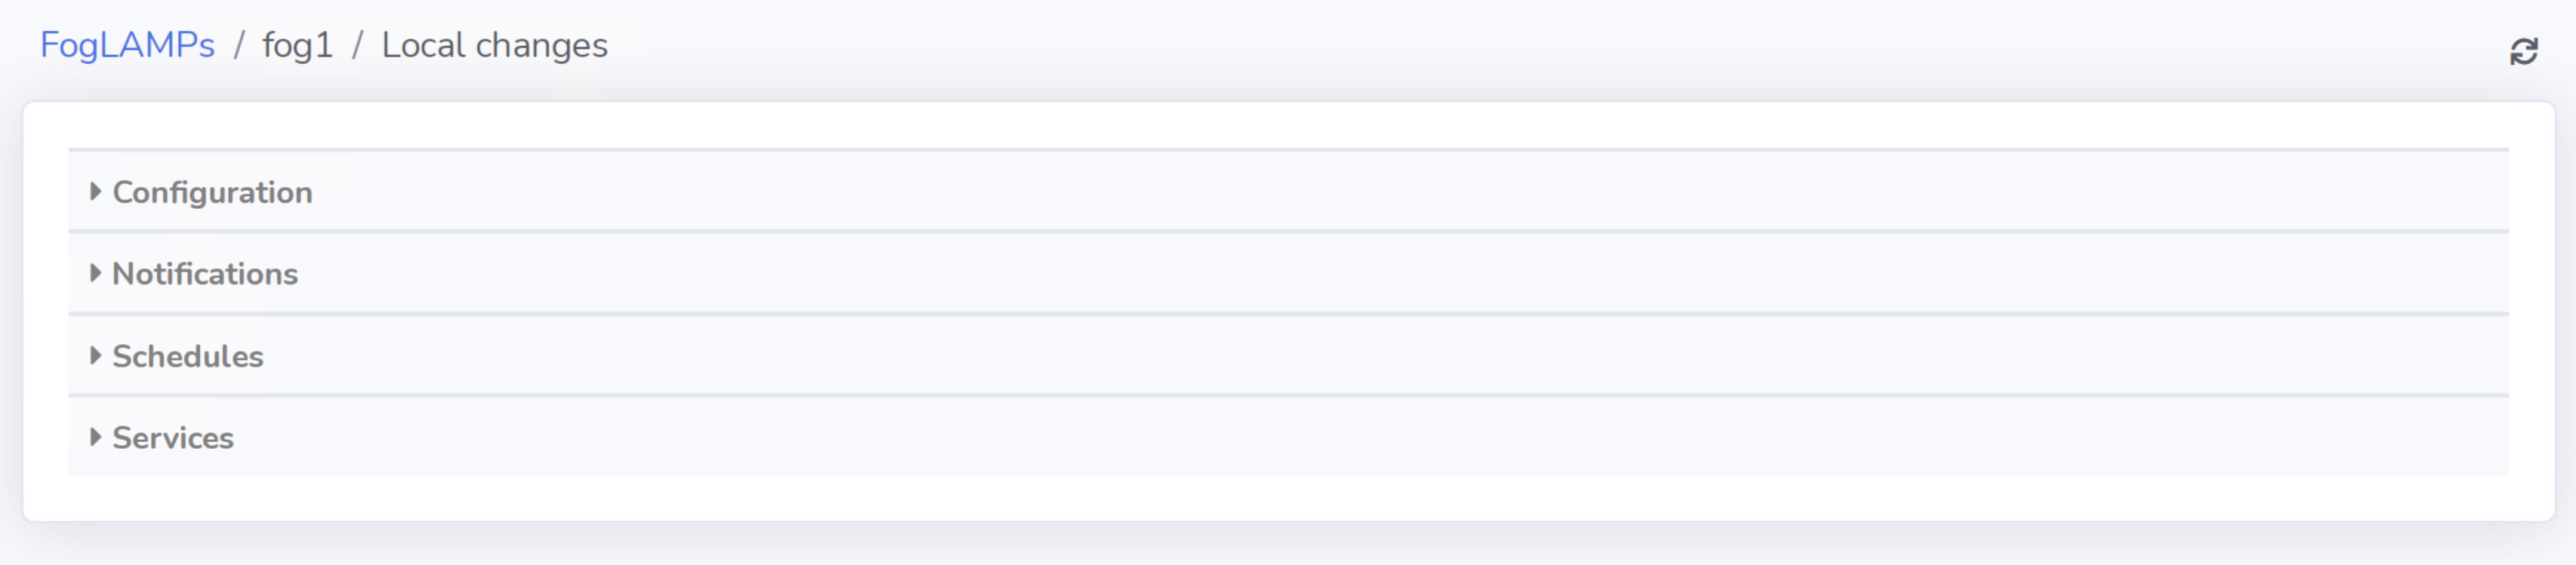
If no local changes have been made on the FogLAMP, the Local Changes page will not have any changes to Accept or Discard. The Configuration, Notifications, Schedules, and Services sections will be empty.
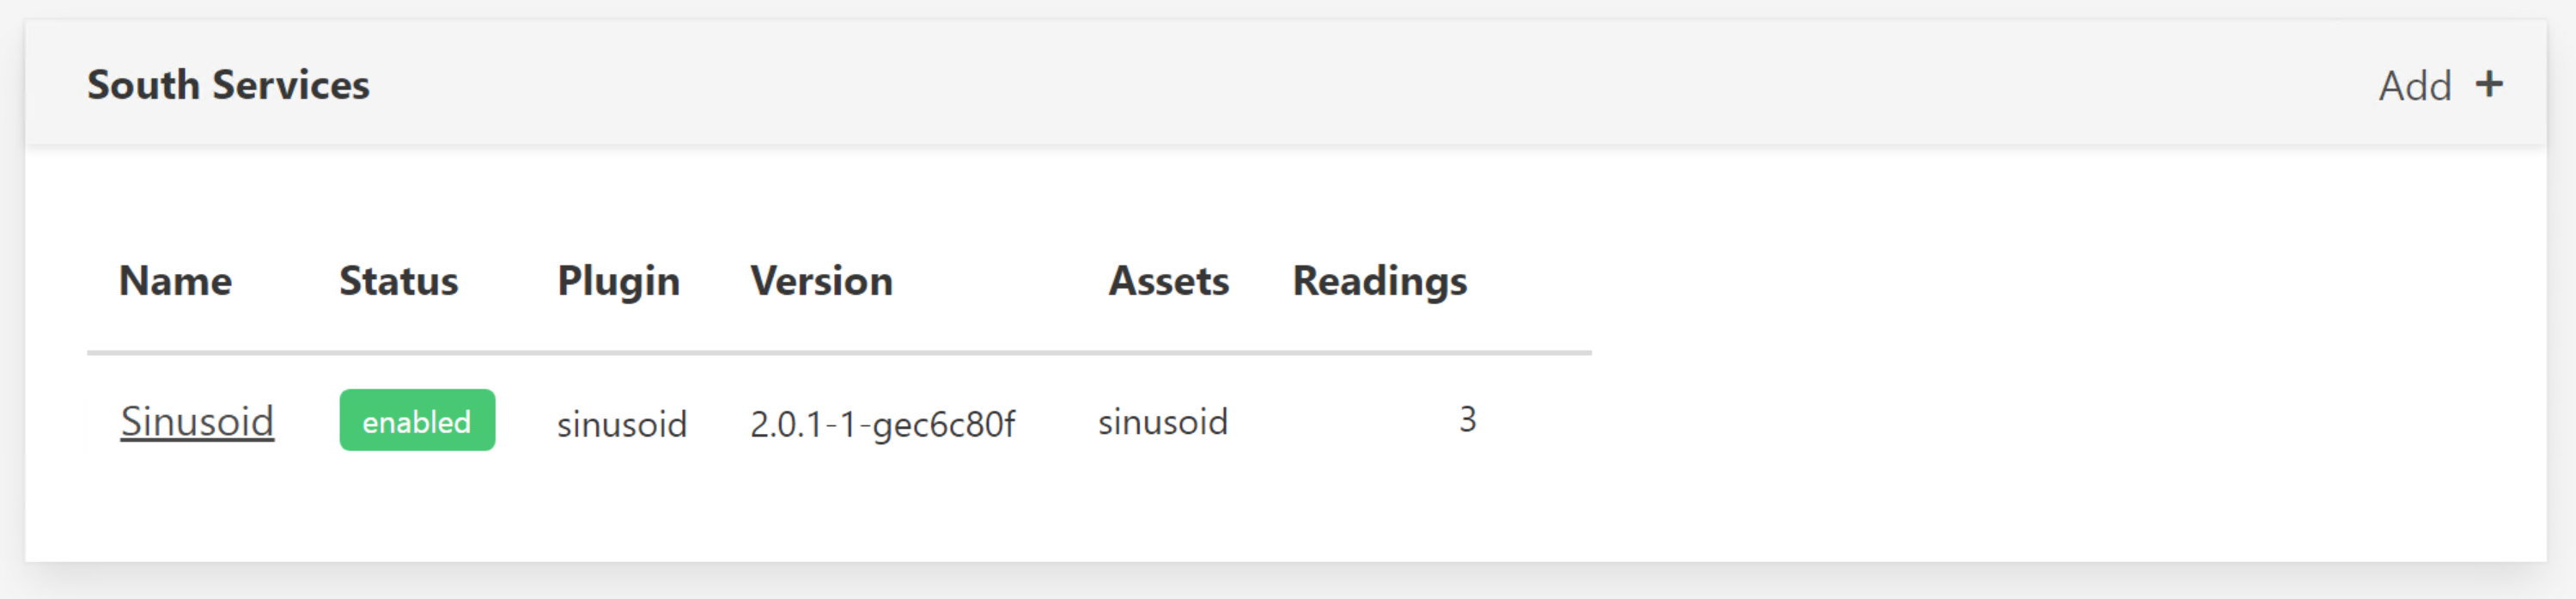
Now to make some example Local Changes, we can open the FogLAMP GUI and create a new Sinusoid South Service.
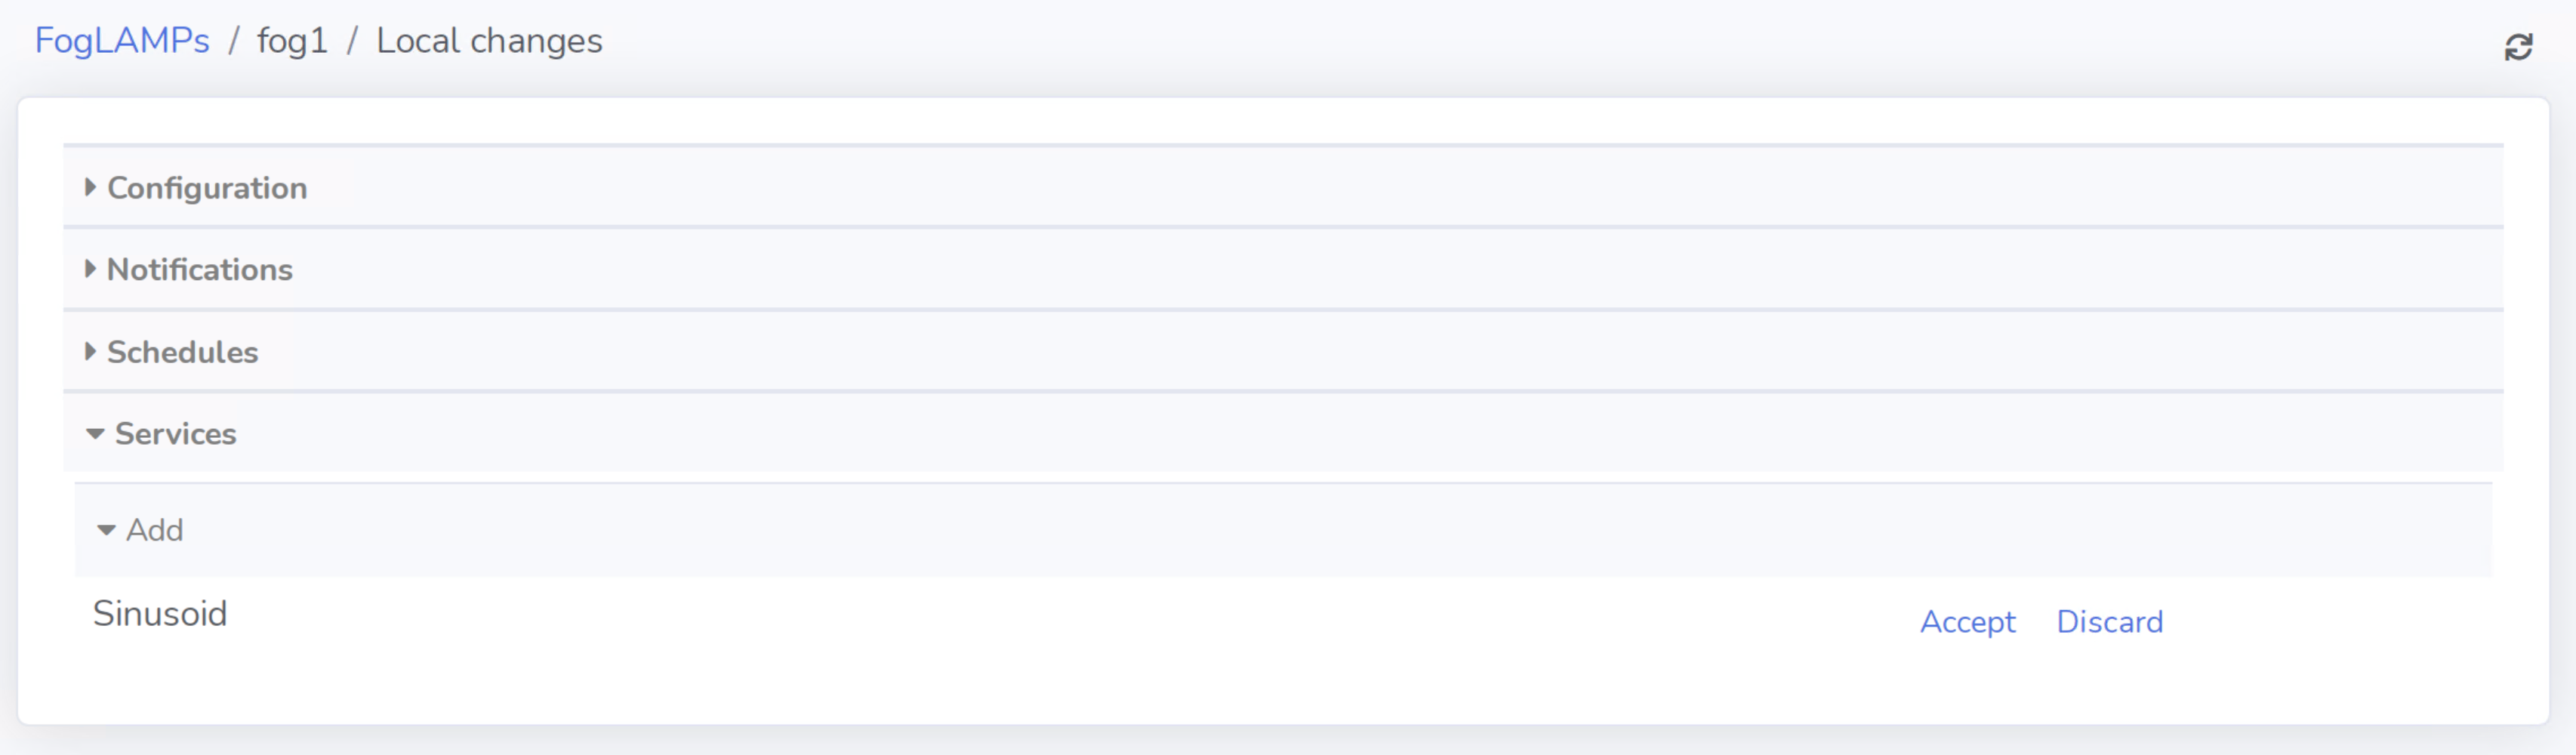
If we refresh the Local Changes page within FogLAMP Manage, the locally added Sinusoid instance can be seen under Services -> Add -> Sinusoid. Click Accept to import the change into FogLAMP Manage.
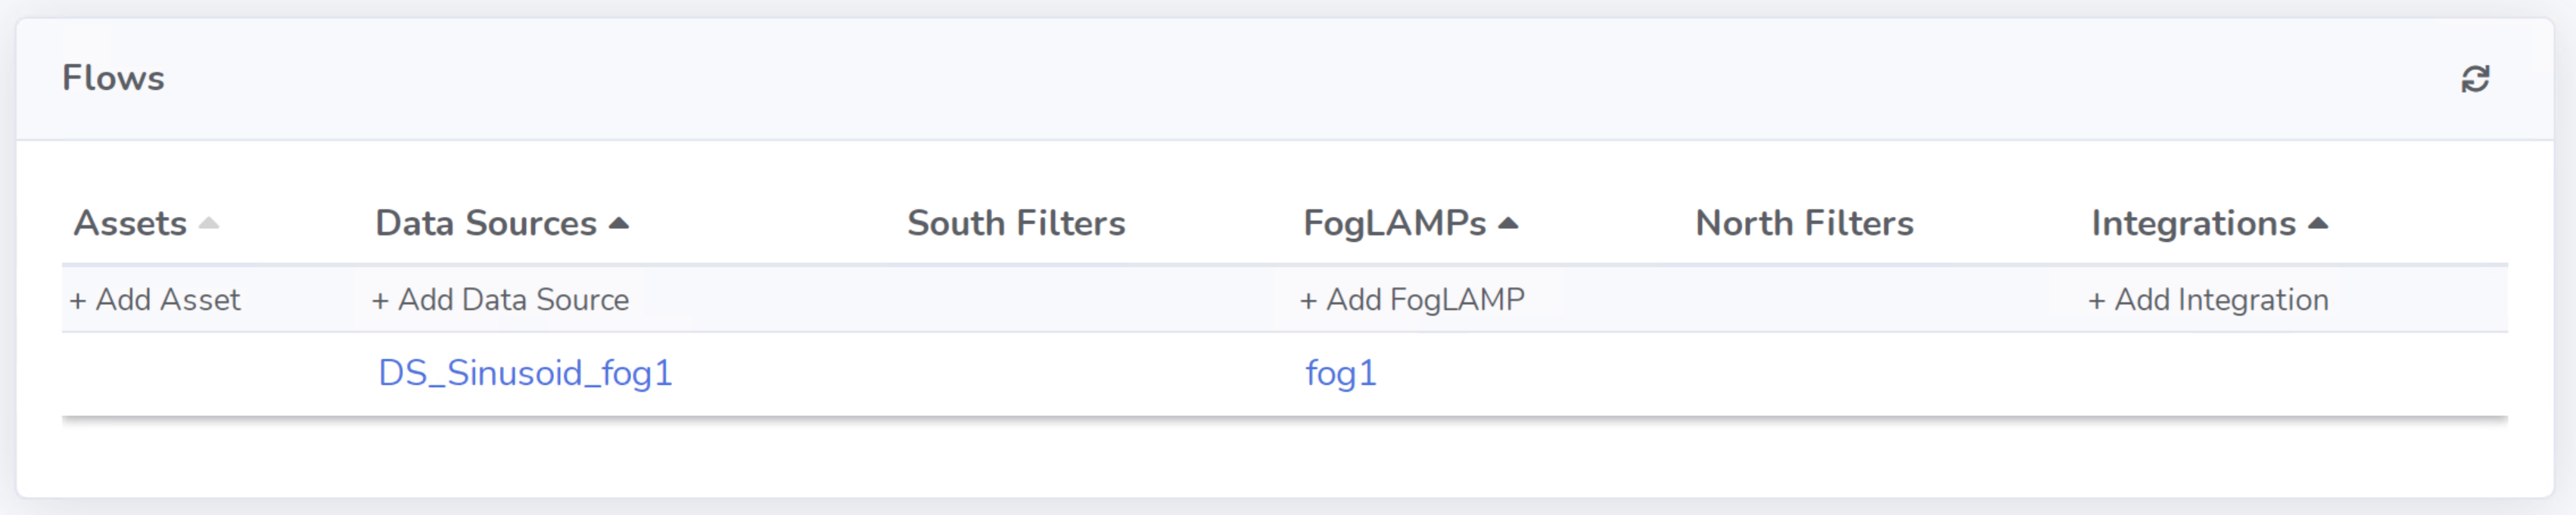
Navigate to the Flows page to observe the newly accepted Sinusoid instance represented as a Data Source attached to the FogLAMP. Imported South Services become Data Sources with the naming convention DS_{NameOfSouthService}_{NameOfFogLAMP}. Similarly, imported North Services become Integrations with the naming convention INT_{NameOfNorthService}_{NameOfFogLAMP}.
The Local Changes feature is not limited to South Services and North Services. Filters, notifications, schedule changes, and configuration changes can be imported as well.